Blinking an LED with libgpiod
In the previous post we introduced libgpiod. In this post we’ll use the command line tools to blink an LED. Finally, we’ll write some C code to blink the LED using the libgpiod library.
Table of Contents
LED Driver Circuit
Skip this section if you already have a good circuit to drive an LED. A simple NPN Transistor is a cheap and robust LED drive that only requires two resistors.
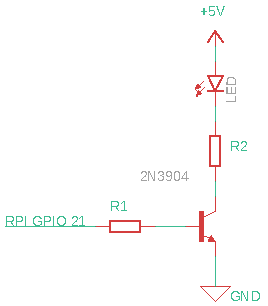
Let’s say you have an LED like this. This LED can take a maximum of \( 30mA \), so let’s reduce to \( 20mA \). The LED has a Forward Voltage of \( V_f=1.8V \) typical. The current going through the LED is:
\( 20mA = \frac{5V - 1.8V}{ R_2 } \)
Solving for \( R_2 \) we have:
\( R_2 = \frac{3.2V}{20mA} = 160\Omega \).
For \( R_1 \) let’s just drive \( 1mA \) out the GPIO Pin 21 so we have:
\( 1mA = \frac{3.3V - 0.7V}{R_1} \).
Solving for \( R_1 \) we have:
\( R_1 = \frac{2.6V}{16mA} = 2600 \Omega \).
For both values \( R_1 \) and \( R_2 \) rounding down gives less current and going up risks damaging the LED and Raspberry Pi. Thus, we can use \( 2.7k\Omega \) for a standard value. The value of \( 160 \Omega \) is already standard.
You can easily plug the values for a different LED into the equations above to get the right resistor values.
Blinking the LED with gpioset
We can turn the LED on using the gpioset command:
$ gpioset gpiochip0 21=1and turn it off again with:
$ gpioset gpiochip0 21=0or we can turn it on for a duration:
$ gpioset --mode=time --mode=time --sec=3 gpiochip0 21=1C Code to Blink the LED
// file blink.c
#include <gpiod.h>
#include <error.h>
#include <stdlib.h>
#include <stdio.h>
#include <string.h>
#include <unistd.h>

struct gpiod_chip *chip;
struct gpiod_line_request_config config;
struct gpiod_line_bulk lines;

int
main(int argc, char *argv[])
{
  unsigned int offsets[1];

  int values[1];
  int err;

  chip = gpiod_chip_open("/dev/gpiochip0");
  if(!chip)
  {
    perror("gpiod_chip_open");
    goto cleanup;
  }

  // set pin 21 to 1 (logic high)
  offsets[0] = 21;
  values[0] = 0;

  err = gpiod_chip_get_lines(chip, offsets, 1, &lines);
  if(err)
  {
    perror("gpiod_chip_get_lines");
    goto cleanup;
  }

  memset(&config, 0, sizeof(config));
  config.consumer = "blink";
  config.request_type = GPIOD_LINE_REQUEST_DIRECTION_OUTPUT;
  config.flags = 0;

  // get the bulk lines setting default value to 0
  err = gpiod_line_request_bulk(&lines, &config, values);
  if(err)
  {
    perror("gpiod_line_request_bulk");
    goto cleanup;
  }

  // output value 1 to turn on the led
  values[0] = 1;
  err = gpiod_line_set_value_bulk(&lines, values);
  if(err)
  {
    perror("gpiod_line_set_value_bulk");
    goto cleanup;
  }

  sleep(1);

  // output value 0 to turn off the led
  values[0] = 0;
  err = gpiod_line_set_value_bulk(&lines, values);
  if(err)
  {
    perror("gpiod_line_set_value_bulk");
    goto cleanup;
  }

cleanup:
  gpiod_line_release_bulk(&lines);
  gpiod_chip_close(chip);

  return EXIT_SUCCESS;
}
Building and Running
It’s easy to build and run:
$ gcc -o blink blink.c -lgpiod
$ ./blink
You should see an LED blink for 3 seconds.