Audio Clip Capture by Threshold
Updated December 28th 2022
Here is a command line tool to capture audio clips based on two thresholds. Keep the tool running and it will write a number of audio files with audio that is loud enough for long enough. How loud and how long are the thresholds that are inputs to the program. For example we may want to record audio clips that only exceed 3 seconds. The loudness level is meant to keep us from recording noise.
The setup is a microphone attached to a Raspberry Pi. I used multiple microphones to test this, however, the Blue Yeti worked the best for my use case. We require the ALSA - Advanced Linux Sound Architecture.
The motivation for this was three main things: a tool for BPSK Receiver Implementation, and home security purposes. The third motivation, with some major polishing up, capturing audio of animals in nature.
In the future I’d like to add a filtering stage so we can only take audio clips based on frequency or other characteristics.
Criteria to create an Audio Clip
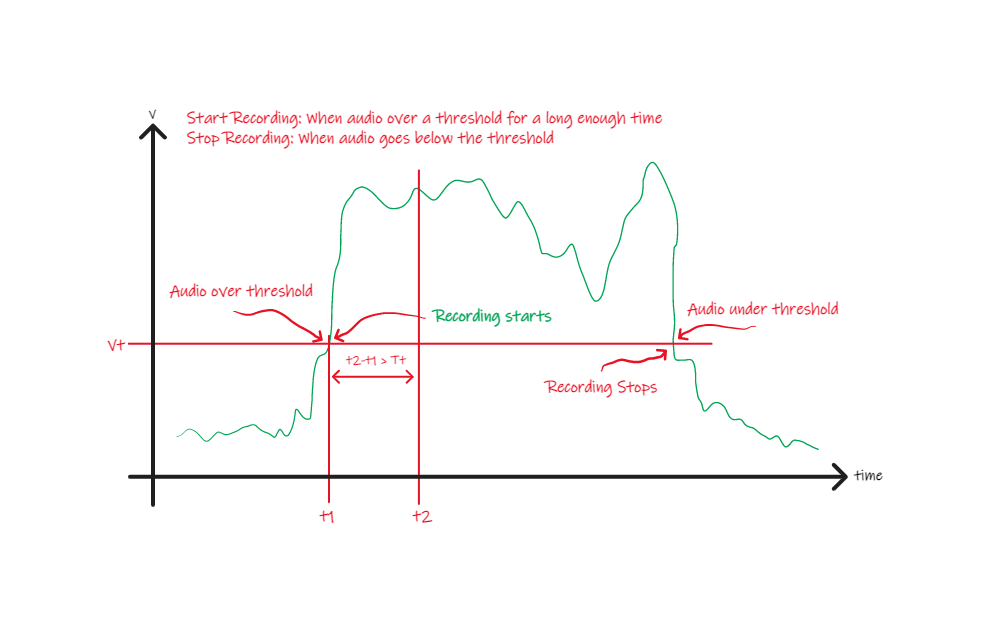
The program is constantly recording and is waiting for the recorded audio level to be above a specified threshold. When above this threshold it starts buffering data that will be potentially saved. If the duration of the audio meets another threshold for duration and the audio level is below this threshold it will write out a file in WAVE format.
These two thresholds are for:
- Filtering out sounds that are not loud enough
- Capturing sounds that are only a certain length
Getting started
It’s a four step process:
- This works only on Unix because we need
alsa. You must also have a microphone connected. I use a USB microphone. - Using
alsawe will configure~/.asoundrcto use our sound card. Usearecord -lto find out. - Download, untar, compile and install the software below
- Capture some audio clips which are written to audio files
Requirements
We need to have alsa installed and know what device our microphone is on.
Install Alsa
It’s likely you already have alsa. If the command arecord -l works then no need to install.
We require that alsa is installed. Then download and install.
Configure your Microphone
Here is an example for a Blue Yeti connected to my Raspberry Pi.
$ arecord -l
**** List of CAPTURE Hardware Devices ****
card 1: Microphones [Blue Microphones], device 0: USB Audio [USB Audio]
  Subdevices: 1/1
  Subdevice #0: subdevice #0
From this I will put into my ~/.asoundrc the following:
$ cat ~/.asoundrc
pcm.!default {
  type plug
  slave {
    pcm "hw:1,0"
  }
}

ctl.!default {
  type hw
  card 1
}
Download, Untar, Compile and Install
This project is the source and not meant to install. That is to say we could the installer tarball from this source. To install and use the project do the following:
apt install libasound2-dev
wget http://lloydrochester.com/code/aclip-1.0.tar.gz
tar xf aclip-1.0.tar.gz
cd aclip-1.0
./configure
make
make install
The source for this repo can be found on github.
Uninstalling
You can uninstall it by going to the same directory where it was installed:
cd aclip-1.0
make uninstall
Usage
Here are the supported options once installed:
$ ./aclip --help

Usage: ./aclip [OPTIONS]

Options:
-h, --help                  Print this menu
--sampling-rate INTEGER     Sampling Rate [48000]
--num-channels INTEGER      Number of Channels [1]
--y-thresh INTEGER          Y-Axis Threshold [1000]
--x-thresh-seconds DECIMAL  X-Axis Threshold in Seconds [3.0]
--alsa-device STRING        Alsa device to connect [default]
--record                    Unconditionally Record Audio
--out-directory STRING      Directory to save files in [./]
I use the aforementioned ~/.asoundrc file so I don’t have set the --alsa-device option.
Running, without options and getting some clips looks like this:
$ ./aclip
Sampling rate: 48000, Channels: 1, Frames: 24000
Trigger Audio Level: 1000 (0.02%), Minimum clip duration 3.00s
recording ... wrote 6 frames to file ./clip_6.50_2021-04-10-07:31:29.wav
recording ... wrote 8 frames to file ./clip_9.00_2021-04-10-07:31:37.wav
^C
The options for the audio recording “loudness” are --y-thresh and for the duration of the sound is --x-thresh-seconds. See from the output above the level at 1000 is 0.02% and is meant to be above the noise floor.
Output File Format
An example output file is clip_6.50_2021-04-10-07:31:29.wav which has the format clip_{duration}_YYYY_MM_DD_TIME.wav.